


Observability and data management supplier Apica announced a Freemium version of its Ascent offering, providing free access to an enterprise-grade telemetry pipeline and intelligent observability, processing up to 1 TB/month of logs, metrics, traces, events, and alerts. Ascent is designed to help organizations centrally manage and automate their telemetry data workflows and gain insights from their data. It supports OpenTelemetry. Ascent Freemium users can upgrade to paid tiers as their needs evolve.
CTO/CPO Ranjan Parthasarathy said: “With Ascent Freemium, we offer a comprehensive platform that consolidates telemetry data management and observability, while leveraging AI/ML workflows and built-in AI agents to significantly reduce troubleshooting time.” Sign up here.
…
Data orchestrator and manager Hammerspace is a finalist in three major categories at theCUBE Technology Innovation Awards: “Most Innovative Tech Startup Leaders” for CEO and co-founder David Flynn, the “HyperCUBEd Innovation Award – Private Company,” and “Top Data Storage Innovation.” Winners will be announced on February 18. The Most Innovative Tech Startup Leaders honors exceptional individuals from a B2B tech company who have significantly advanced the industry through groundbreaking ideas, leadership, and execution.
…
In-memory grid provider Hazelcast has joined the STAC Benchmark Council.
…
On-prem, hybrid, public cloud, and SaaS app data protector HYCU is now a Dell Technologies Extended Technologies Complete (ETC) program member, one of only two data protection providers to be a member. The other is Druva. There is more information in CEO Simon Taylor’s blog post.
…
HYCU R-Cloud was named a winner in the annual TechTarget Storage Products of the Year Awards. It won Bronze in the Backup and Disaster Recovery Hardware Software and Services Category in the 23rd Annual Awards edition of the TechTarget Storage Products of the Year.
…
The IBM Storage Ceph for Beginners document has been updated to v2.0 and includes NVMe-oF Gateway and native SMB protocol support. NVMe-oF Gateway is said to be ideal for VMware and other high-performance block workloads. Download the document here.
…
Tape backup hardware supplier and service provider MagStor has joined the Active Archive Alliance. Pete Paisley, MagStor’s VP of Business Development, said: “As MagStor has grown to offer increasingly capable tape storage hardware, media, and data services, we seek opportunities to add our voice to the storage archive ecosystem to help customers better solve problems related to AI and exponential data growth at the lowest possible cost.” Active Archive Alliance members and sponsors include Fujifilm, MediQuant, Spectra Logic, Arcitecta, Cerabyte, IBM, Iron Mountain, Overland Tandberg, PoINT Software & Systems, QStar Technologies, Savartus, S2|Data, Western Digital, and XenData.
…
Wedbush analysts told subscribers it believed nearline disk drive sales volumes came in the low to mid 16 million unit range. This result implies an incremental few hundred thousand units for both Seagate and Western Digital. It said: “Generally, we see favorable trends continuing through the next few quarters with industry units likely holding around current levels and ASPs appearing set to lift modestly.”
The flash market was different: “For NAND, we believe the quarter was defined by sharper than expected ASP declines as enterprise demand dipped sharply.” It was due to three factors: continued workdowns in client device OEM SSD and module inventories; a sharp drop in high capacity SSD demand tied to GPU server shipment delays; and a push by hyperscale customers to moderate pricing.
…
Solidigm announced a multi-year extension of its agreement with Broadcom on the use of high-capacity SSD controllers to support AI and data-intensive workloads. Broadcom’s custom controllers have served as a critical component of Solidigm SSDs for more than a decade, with more than 120 million units of Solidigm SSDs shipped featuring Broadcom controllers. The agreement also includes collaboration on Solidigm’s recently announced 122 TB D5-P5336 datacenter SSD, at the time of publication the world’s highest capacity PCIe SSD.
…
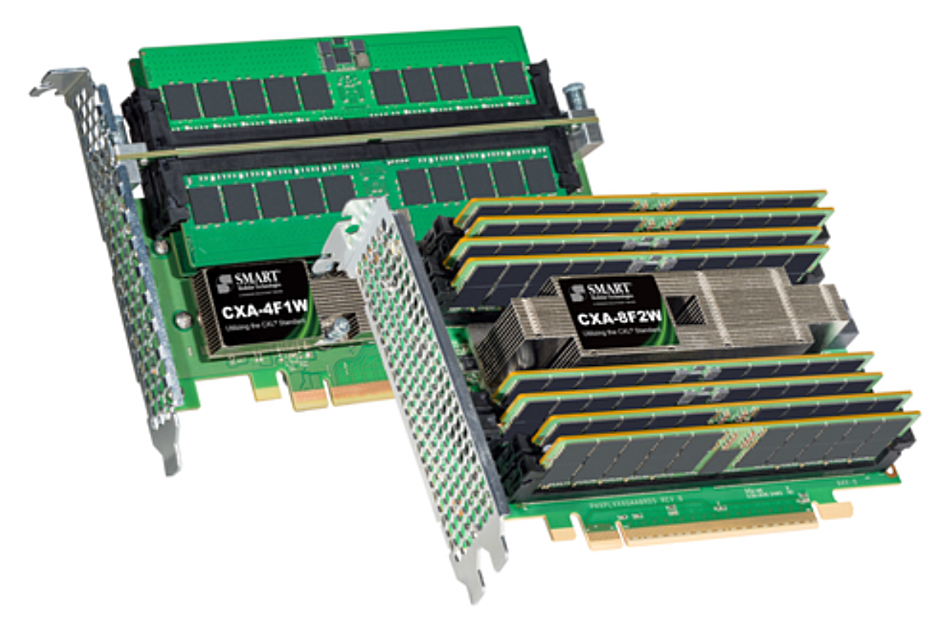
SMART Modular announced that its 4-DIMM and 8-DIMM CXL (Compute Express Link) memory Add-in Cards (AICs) have passed CXL 2.0 compliance testing and are now listed on the CXL Consortium’s Integrators’ List.
…
Multi-protocol storage array provider StorONE has added Kubernetes integration to its ONE Enterprise Storage Platform product. It allows all customers to benefit from Kubernetes functionality as part of their existing license, free of charge, after upgrading to the latest version. They gain access to StorONE’s data protection, security, and snapshots in Kubernetes environments. StorONE features like auto-tiering, snapshots, and replication work seamlessly alongside Kubernetes. More information here.
…
TrendForce said a magnitude 6.4 earthquake struck southern Taiwan, with its epicenter in Chiayi, at 12:17 AM local time on January 21. TSMC and UMC’s Tainan fabs, which experienced seismic intensity levels above 4, initiated immediate personnel evacuation and equipment shutdowns for inspections. While no critical equipment damage was reported, unavoidable debris was generated inside furnace equipment. Operations at these facilities began resuming on the morning of January 21, with TrendForce noting that the earthquake’s impact on production appears to be within controllable limits.


